Showing posts with label photography tips. Show all posts

Tuesday, 11 August 2009

Rhadee da de plop deee pooo, you lot come & see a photooooo....


....Well it kind of rhymed.

Not a lot to say apart from WHEN will my marketing work - WHAT am I doing wrong - WHO is going to book me for some jobs and - WHY am I not half as busy as i want to be. I have the passion, the fight and yet still I seem to be getting nowhere. At what point do you give up?!

I can take pics and not bad one's at that.

Am I utilizing my contacts as well as I should?

You lot out there - need some pics?

Donations of money, hugs, enthusiasm or connections welcome.

Oh, check out my site if you fancy. Its all new and shiny and has lots of new piccies on it.

(Pic courtesy of www.nataliedee.com)

Friday, 19 June 2009

Adjustment Layers......How to

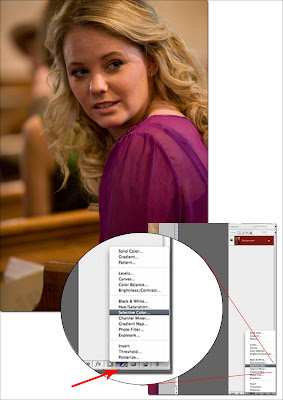
Right, thought I better be of some use or of use to some of you, whichever I have decided to do a post about photoshop! So for those of you that don't know, this is a mini tutorial on using adjustment layers. I have used CS3 on a mac so things may differ if using a older / newer version or a PC.

Adjustment layers basically allow you to adjust curves, colour balance, saturation, levels and various other common editing tools by layer, so you can target different areas of the image rather than the
whole thing. This is particularly useful when colour managing an image as you can concentrate on the skin, then the hair, then the background and so forth building up as many layers as you like. Plus you use the brush so can choose opacity and the use of layers allows you to alter opacity as well.

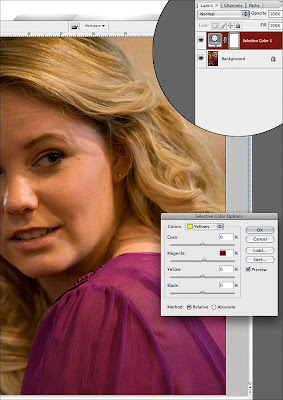
So open your image. Choose the area to focus on. In this case I am reducing the red in the face and the yellow in the background. First your go to the layers palette and select the 'adjustment layer' tool. A new layer will appear with whatever adjustment you have chosen. In my example you can see that I have used the selective colour tool, therefore my new layer is concentrating on adjusting various colour channels within the image.

Adjust as you would but concentrate only on the part of the image you want to change. So in this c
ase I am adjusting the magenta / red in the face. Don't worry about anything else in the image, just the part you want this colour adjustment to apply to.

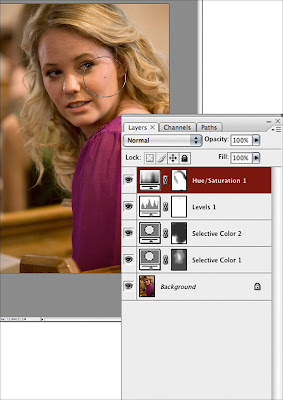
Once done select the mask on the layer, take the brush tool, make sure black is selected and choose your opacity. I would recommend 50% at first, subtle but it works. Then brush back in those areas you do not want the changes to take place. So, in this case I brushed back in the clothes, background and hair so that the adjustment only affected the face. You can then adjust the opacity of the layer if you wish.

You can also do as many layers as you like. So the next example shows a few more colour adjustment layers and you can see from the mask where the picture has been affected and where it has not. Each new layer will concentrate on a different part of the image.

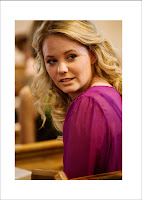
Once you have what you want and you are happy with the adjustments you can carry on editing as normal!


PS: For skin, selective colour is often used. However I find that using the hue/saturation tool is just as effective when using layers and just change the hue ever so slightly and the saturation of the magenta.


More random ramblings and tips and tricks to follow next week! If there is something in particular you want to know.....get in touch!

Carli x

Friday, 12 June 2009

rocks, small stones & BIG mountains....

The last few days have been rocky. Business has ups and downs, we all know this but when you are on your knees in desperation worrying about money, when your next job is going to make an appearance and sifting through marketing tips but really not knowing how to deal with them....things do not seem good. Then, wisely, you decide to learn more about other people's business's. Normally this would fill you with ideas and encouragement, look where you can be! Ok well bugger that, today I hit ROCK bottom and these successful companies and friends achieving goals and putting their marketing ideas into feasible well executed plans are nothing but a slap in the face. I felt truly defeated. I am a creative, not a business person and what i thought i knew, I realized is just not enough to get me through.

What do you do when you feel like this, who do you turn to?! There is a great need at the moment for a group of marketing people who offer advice. Not big PR firms or marketing companies but small freelance business savvy folk who can offer decent, affordable, structured and achievable marketing for the small business - I can see a place for that.

Anyway, after threatening to set a crow loose on someone and hoping their eyes were pecked out; shouting a little & having a good moan to a friend, oh and that huge chocolate bar I felt a little better. Then my business link advisor sent through some marketing stuff we had discussed last week which means I can make a true start on that marketing plan i should have done last year. Then a very good client of mine decided to spend another £700 on digital files and another phone call to offer me some assisting. My afternoon was looking brighter and brighter and it was even topped off with the possibility that I may be able to see my man this weekend as he is willing to drive from Manc to give me what is now, a celebratory hug!

Ramblings I know but the motto of this little ditty - Have faith! Business doesn't land on your lap and good luck doesn't exist, you make your own luck. But with some plans in place, some promises to yourself that you really will keep, a goal in mind and some encouragement from friends and you will get there! I believe again, almost!

If you are still struggling and need some inspiration, I have listed below some websites that I often find useful for an up the bottom kick; if not that then some darn good time wasting!

FILE magazine

Signing out Foto's

Thursday, 28 May 2009

"well can uncle John JUST tile my bathroom?!"

Weekly pic update here we come. Ok so thought I would write something useful or at least try. I am not feeling witty today (I blame the sun, I usually manage to muster up some wit at least) so onwards & upwards with a burst of knowledge to tell you lovely people. Naturally, we are going to be focusing on photography and a few odd bits and bobs really which I think you may find useful.

The most feared question by all photographers is "do you mind just taking a few pics if your there anyway." or ...."Oh can you just snap a pic of Uncle Ron."

This drives photographers (ok maybe just me) I-N-S-A-N-E!!!!!!!!! So, if your mum who just happens to be an accountant was at the party and I turned up and asked her to have a browse through my taxes would that be acceptable?! If your brother was a builder and I rocked up with a shelf that needed a bracket fixing or a load of bricks and cement asking him to knock me up a quick shed, would he do it....would you think I was insane?! If you get asked this question - KNOW your answer.

Basically you are your photos. EVERY photograph you EVER take you will be judged on. As a photographer that is what people do. And as a photographer why would you want to take a bad picture? Every pic you take you will try 100%, you will put all your effort into and want it to be good. So 'Just' taking a quick snap should not be an option for you.

It is a good idea to start with clear definitions. I have done the whole guest & photographer thing and it doesn't work, you are either one of the other. You bring all your equipment, wear your comfy shoes and get the picture you and the friend / client are after OR you put on your heels, wear your favorite skirt and have nothing in your handbag but some lippy & your i-phone.

QUICK TIPS......
1) Bounce your flash off white walls or corners to create a softer look and to avoid blinding your subject

2) Set your ISO to the lower value rather than the higher. Use as low as you can get away with to avoid noise. (If you are using the 5D Mark 2 you will not need to worry about this, that bad boy can go up to 1600 easily!)

3) Experiment with angles. Don't move your subject, you move! Stand somewhere it makes you feel uncomfortable and get a new view.

4) Use the history tool brush on Multiply (darker) or Screen (lighter) to adjust the shades and highlights on your image where you might usually dodge and burn. The effect is far more subtle and you have far more control over the exposure changes and colour.

More next week - if there is something you want to ask / want to rant about or want to know......give me a shout and i will post! carli@carli-art.co.uk.

PS: Competition to follow - win 'How to Photograph Almost Anything!' Details to follow in next few weeks.


Carli x